我这里用的是cocosCreator 3.7.2版本,不同版本可能存在差异
前面有一个篇文章也是介绍在cocosCreator中创建圆形遮罩的cocosCreator教程:如何创建圆形遮罩(Mask),但是之前是使用的mask遮罩,这里介绍一种新的方法,使用Shader。这两种方法可以实现同样的效果,但是drawCall会有所不同。
具体步骤:
1、创建一个circle-mask.effect文件
复制粘贴下面内容:
1
2
3
4
5
6
7
8
9
10
11
12
13
14
15
16
17
18
19
20
21
22
23
24
25
26
27
28
29
30
31
32
33
34
35
36
37
38
39
40
41
42
43
44
45
46
47
48
49
50
51
52
53
54
55
56
57
58
59
60
61
62
63
64
65
66
67
68
69
70
71
72
73
74
75
76
77
78
79
80
81
82
83
84
85
86
87
88
89
90
91
92
93
94
95
96
97
98
99
100
101
102
103
104
105
106
107
108
109
110
111
112
113
114
115
116
| // Copyright (c) 2017-2020 Xiamen Yaji Software Co., Ltd.
CCEffect %{
techniques:
- passes:
- vert: sprite-vs:vert
frag: sprite-fs:frag
depthStencilState:
depthTest: false
depthWrite: false
blendState:
targets:
- blend: true
blendSrc: src_alpha
blendDst: one_minus_src_alpha
blendDstAlpha: one_minus_src_alpha
rasterizerState:
cullMode: none
properties:
alphaThreshold: { value: 0.5 }
radius: { value: 0.5, editor: { tooltip: "圆半径(0~0.5 常用,0.5为贴边圆)" } }
softness: { value: 0.003, editor: { tooltip: "边缘羽化(越小越硬边)" } }
}%
CCProgram sprite-vs %{
precision highp float;
#include <builtin/uniforms/cc-global>
#if USE_LOCAL
#include <builtin/uniforms/cc-local>
#endif
#if SAMPLE_FROM_RT
#include <common/common-define>
#endif
in vec3 a_position;
in vec2 a_texCoord;
in vec4 a_color;
out vec4 color;
out vec2 uv0;
vec4 vert () {
vec4 pos = vec4(a_position, 1);
#if USE_LOCAL
pos = cc_matWorld * pos;
#endif
#if USE_PIXEL_ALIGNMENT
pos = cc_matView * pos;
pos.xyz = floor(pos.xyz);
pos = cc_matProj * pos;
#else
pos = cc_matViewProj * pos;
#endif
uv0 = a_texCoord;
#if SAMPLE_FROM_RT
CC_HANDLE_RT_SAMPLE_FLIP(uv0);
#endif
color = a_color;
return pos;
}
}%
CCProgram sprite-fs %{
precision highp float;
#include <builtin/internal/embedded-alpha>
#include <builtin/internal/alpha-test>
in vec4 color;
#if USE_TEXTURE
in vec2 uv0;
#pragma builtin(local)
layout(set = 2, binding = 12) uniform sampler2D cc_spriteTexture;
#endif
// 新增:圆形裁剪参数(会从 properties 自动注入到 Constant 块)
uniform Constant {
float radius;
float softness;
};
vec4 frag () {
vec4 o = vec4(1, 1, 1, 1);
#if USE_TEXTURE
o *= CCSampleWithAlphaSeparated(cc_spriteTexture, uv0);
#if IS_GRAY
float gray = 0.2126 * o.r + 0.7152 * o.g + 0.0722 * o.b;
o.r = o.g = o.b = gray;
#endif
#endif
o *= color;
// ========= 圆形裁剪(核心改动)=========
#if USE_TEXTURE
vec2 center = vec2(0.5, 0.5);
float dist = distance(uv0, center);
// dist < radius -> alpha≈1
// dist > radius -> alpha≈0
float a = smoothstep(radius, radius - softness, dist);
o.a *= a;
// 透明到几乎不可见就丢弃,省一点填充率
if (o.a <= 0.001) discard;
#endif
// =====================================
ALPHA_TEST(o);
return o;
}
}%
|
2、创建一个材质文件
在材质文件的Effect字段中,选择circle-mask.effect文件。
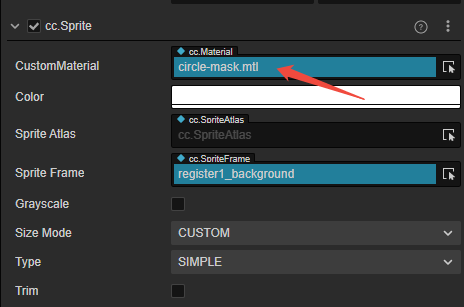
3、在精灵节点的Sprite组件中,将材质文件设置为circle-mask.mtl文件。
![]()
注意事项
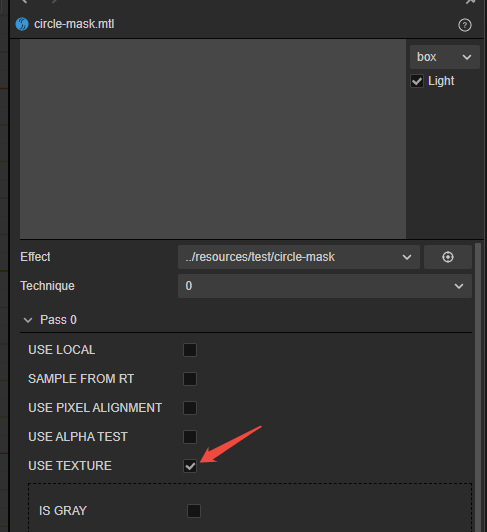
1、如果图片拖入材质后变成了白色图片,在材质中勾选USE TEXTURE
![]()
2、如果是远程资源,可能会出现在加载后不是圆形图片的情况,所以这里建议只在本地资源上使用
3、如果图片不是正方形,这里会出现图片为椭圆的情况。