最近新换了个博客主题,matery,感觉这个主题还挺好看的。
相信很多人和我一样,换了主题就想着各种美化,魔改,怎奈技术不到位,自己没有这个能力,只能在网上看看别人是怎么改的,然后自己照做。废话不多说,步入正题。
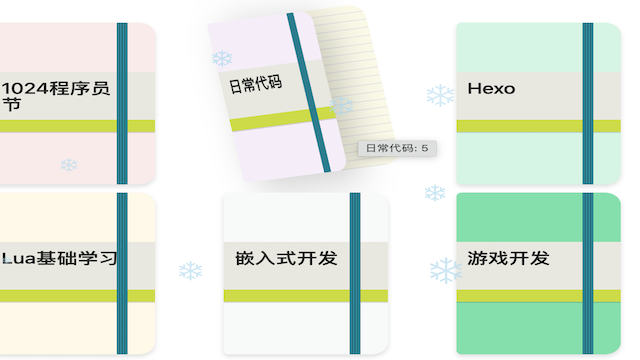
先给看下效果图吧,喜欢就接着往下看
![效果图]()
![效果图]()
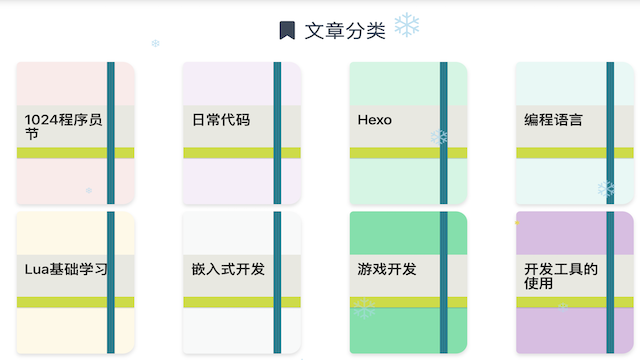
文章分类页美化
引入代码
- 首先,打开”/layout/category-cloud.ejs”文件
- 找到下面代码
1
2
3
4
5
| <span class="chip center-align waves-effect waves-light
<% if (isCategory && category.name == page.category) { %> chip-active <% } else { %> chip-default <% } %>"
style="background-color: <%- color %>;"><%- category.name %>
<span class="tag-length"><%- category.length %></span>
</span>
|
- 将上面代码修改为下面代码
1
2
3
4
5
6
7
8
9
10
11
12
13
14
| <div class="moleskine-wrapper">
<div class="moleskine-notebook">
<div class="chip notebook-cover center-align waves-effect waves-light
<% if (isCategory && category.name == page.category) { %> chip-active <% } else { %> chip-default <% } %>"
style="background-color: <%- color %>;">
<div
class="notebook-skin
<% if (isCategory && category.name == page.category) { %> chip-active <% } else { %> chip-default <% } %>">
<%- category.name %>
</div>
</div>
<div class="notebook-page dotted"></div>
</div>
</div>
|
设置css
将下面代码放在category-cloud.ejs文件末尾
1
2
3
4
5
6
7
8
9
10
11
12
13
14
15
16
17
18
19
20
21
22
23
24
25
26
27
28
29
30
31
32
33
34
35
36
37
38
39
40
41
42
43
44
45
46
47
48
49
50
51
52
53
54
55
56
57
58
59
60
61
62
63
64
65
66
67
68
69
70
71
72
73
74
75
76
77
78
79
80
81
82
83
84
85
86
87
88
89
90
91
92
93
94
95
96
97
98
99
100
101
102
103
104
105
106
107
108
109
110
| <style>
.chip-container .tag-chips {
display: flex;
flex-wrap: wrap;
justify-content: space-around;
}
.chip-container .tag-chips a {
margin: 0 7px 10px;
}
.chip-container .chip {
max-width: calc(100% / 4);
min-width: 10em;
height: 200px;
position: relative;
transition: .5s linear;
padding: 19px 0;
line-height: 20px;
z-index: 990;
border-radius: 5px 15px 15px 5px;
transform-origin: left center 0;
}
.chip-container .notebook-cover::before {
content: "";
position: absolute;
width: 10px;
height: calc(100% + 2px);
top: -1px;
z-index: 100;
border-radius: 2px;
right: 25px;
transition: 2s ease;
background: linear-gradient(to right,#1e606e 0,#2e95aa 12%,#1e606e 25%,#2e95aa 37%,#1e606e 50%,#2e95aa 62%,#1e606e 75%,#2e95aa 87%,#1e606e 100%);
}
.chip .notebook-skin {
height: 50px;
width: 100%;
background: #e8e8e0;
margin-top: 42px;
padding: 10px 32px 64px 10px;
font-size: 19px;
position: relative;
z-index: 10;
color: #222;
text-align: left;
box-shadow: 0 1px 1px rgba(0,0,0,.2);
}
.chip .notebook-skin:before {
content: '';
position: absolute;
width: 100%;
height: 15px;
left: 0;
bottom: 0;
background: #cddc39;
}
.notebook-cover {
background: #cc4b48;
height: 200px;
width: 140px;
position: absolute;
border-radius: 5px 15px 15px 5px;
z-index: 10;
transition: .5s linear;
transform-style: preserve-3d;
transform-origin: left center 0;
}
.moleskine-wrapper {
max-width: calc(100% / 4);
min-width: 10em;
}
.moleskine-notebook:hover .notebook-cover {
transform: rotateY(-50deg);
z-index: 99;
box-shadow: 20px 10px 50px rgba(0,0,0,.2);
}
.moleskine-notebook {
height: 200px;
position: relative;
display: flex;
flex-wrap: wrap;
justify-content: space-around;
transition: .5s linear;
border-radius: 5px 15px 15px 5px;
transform-origin: left center 0;
}
.moleskine-notebook:hover {
transform: rotateZ(-10deg);
}
.notebook-page.dotted {
background: linear-gradient(to bottom,#fbfae8 9px,#e4e4e4 1px);
background-size: 100% 10px;
}
.chip-container .chip:hover {
background: none;
}
.notebook-page {
height: 100%;
width: 140px;
position: absolute;
top: 10px;
background-color: #fbfae8;
z-index: 0;
border-radius: 5px 16px 16px 5px;
overflow: hidden;
}
</style>
|
做了如上操作,然后部署博客就可以看到变化了哦~
进一步优化
如果对颜色不满意,还可以进行颜色的调整,方法如下
打开source/css/matery.css文件,修改下面代码:
1
2
3
4
5
6
7
8
9
| .chip-container .chip:hover {
color: #2ea451;
opacity: .8;
}
.chip-container .chip-active {
color: #2ea451 !important;
box-shadow: 2px 5px 10px #aaa !important;
}
|
这里是博主自己设置的颜色,你也可以设置为自己喜欢的颜色
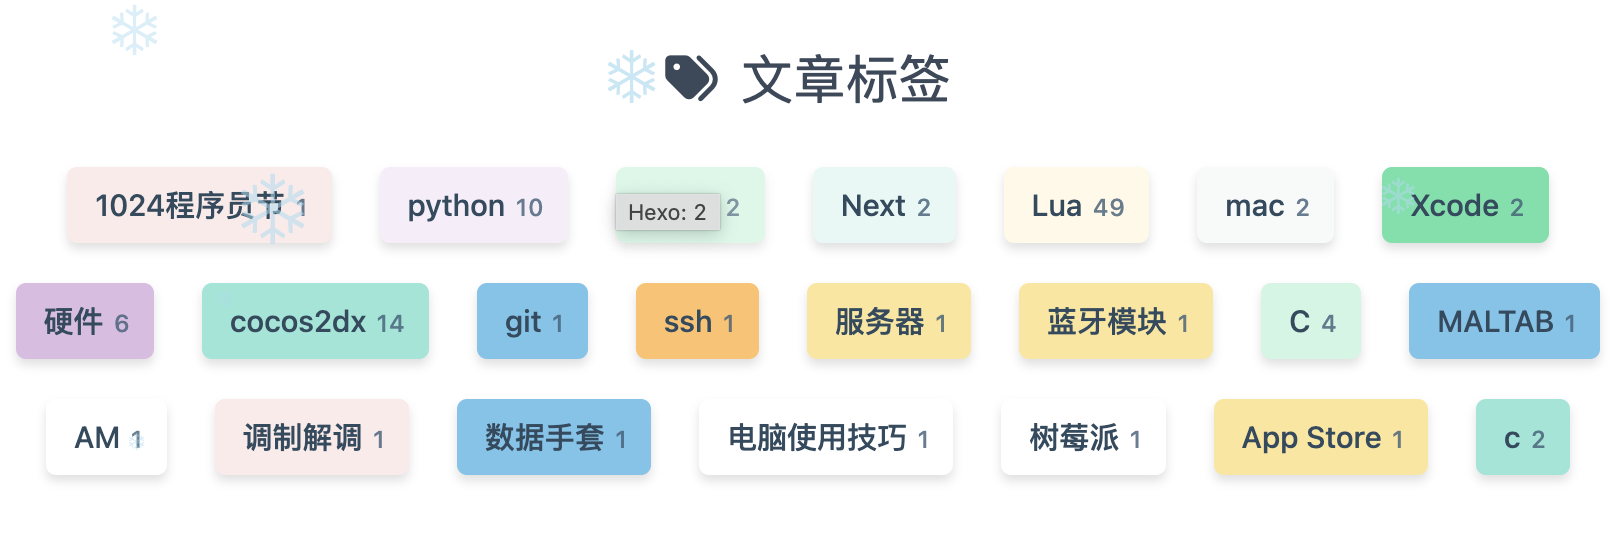
标签美化
标签页就很简单了呀
打开matery.css文件,修改颜色代码
1
2
3
4
5
6
7
8
9
| .chip-default .tag-length {
color: rgba(66, 92, 118, .8);
margin-top: 1px;
}
.chip-active .tag-length {
color: #64c45b;
}
|
效果如图:
![效果图]()
文章参考链接